
Disappearing act
Dust and scratches - or simply an outbreak of acne - can spoil an otherwise
perfect photo. Here’s a quick way to clean up your snaps in Photoshop
Elements.
 Digital air-brushing
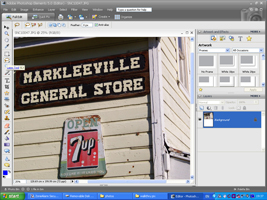
You’ve probably heard about ‘air-brushing’ photos to eliminate
blemishes, and Photoshop Elements makes this easy. Start by opening an image
with unsightly spots or specks – anything from skin to sky to a cathedral
wall. In the Photoshop Elements main window, there’s a toolbar of icons
on the left hand side. The Lasso tool looks like a rope and is used for circling
an area. Click on it, then select the normal Lasso shape from the toolbar above
the picture.
 Quick on the draw
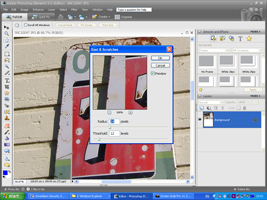
Now position the cursor near the spots and hold down the mouse button. Without
letting go, draw roughly around the spots. It doesn’t have to be a neat
line, but try not to stray into areas that don’t need fixing. When you
release the button, the line flashes to show the area selected. If it’s
not right, don’t worry: just hit the Escape key (top left of your keyboard)
and start again. Now go to the Filter menu at the top and choose Noise, then
Dust & Scratches.
 Clean sweep
Clean up backgrounds
Did you really want that tree sprouting out of your friend’s head? Use
Photoshop Element’s Clone tool to fix problem photos in instants.
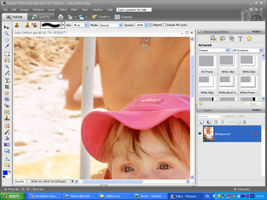
 Take a target
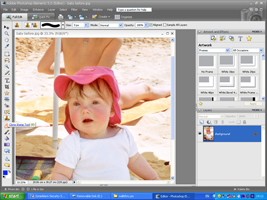
Photoshop Elements has a clever feature that can copy background detail like
sky or sand to erase unwanted items such as trees or the sunbather in this
photo. In the Full Edit screen, choose the Clone Stamp tool from the left side
menu – it looks like a little rubber stamp. Holding down the Alt key,
the cursor now changes into a target shape to let you choose a blank bit of
background to copy. Position this target over a clear area and click once.
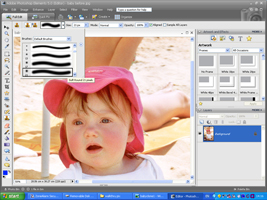 Choose a brush
In the top bar, the black caterpillar shape shows the type of brush selected.
Click on the pull-down tab next to it and choose a medium-sized brush (maybe
27 pixels), with soft edges for an even, natural effect. The cursor turns into
a circle showing the brush size, so pick one to suit the object you want to
erase. If you need to change it, simply type a larger or smaller number in
the box next to it.
 Clone arranger
Now click and drag over the unwanted object. It should disappear as it’s
gradually replaced by background detail from the target point you selected
a moment ago. The Clone tool smoothes edges intelligently, but it isn’t
perfect. If your cloned area may look strange, choose Undo from the Edit menu
and try again, choosing a new target point in step 1. To erase large items,
you’ll probably need to do the whole process several times.